Originally posted on August 1, 2012
Continued from The Backyard Office – Part III
Now for the final wrap-up to this project.
We need power!
One crucial aspect to any home office is power. Running power lines to a detached structure is probably not something that just anyone should attempt, because there are serious ramifications (or potential injury) if done incorrectly. Luckily for me, my father is a licensed general contractor and has decades of experience in this area. Everything will be installed safely and according to the local building codes. This is definitely a piece that should be hired out to a professional if you have any reservations about doing it yourself.
Interior
The first step was to plan out how much power the new office would require. I divided the electrical requirements into separate circuits as follows:
- Air Conditioning – I kept this on its own circuit since even the little window sized unit I chose pulls quite a load.
- Lights and ceiling fan
- Outlets
- Computer outlet – A separate, dedicated circuit for the computer minimizes interference from anything else that might be plugged in to the other outlets.
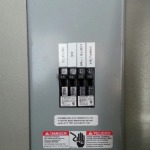 So, inside the office we installed a small circuit breaker box, capable of housing four circuit breakers. We used a 15 amp breaker for each circuit. All of the wires that were run throughout the office during the rough framing, were then wired into the circuit breaker box into their appropriate locations. Here’s a picture of the end product, installed and labeled. I couldn’t find a small four circuit box with a door, and this one protrudes from the wall a little bit, but I plan on covering it with a strategically placed picture or something later anyway.
The other little detail of the interior wiring is installing all of the outlets and light switches. This task is fairly straightforward, although very time consuming. Installed six outlets and one triple panel light switch (dimmer switch for the interior lights, and regular switches for the ceiling fan and exterior motion activated light). Now, the interior electrical was completed. On to the outside…
Exterior
This step involves connecting the office’s circuit breaker to the main house’s circuit breaker. Typically, you would add a new circuit to the house circuit breaker for this task, but since I had two spare slots available (after converting from an electric to gas clothes dryer), this part was mostly painless. Utilizing the circuit that fed to the old dryer was also advantageous since we would not need to dig into the house’s circuit breaker too much, only replacing the original breakers for a pair of 30 amp breakers (the two 30 amp lines would then run out to the office to supply power for the four 15 amp circuits). Another bonus in my case was that the position of the dryer was in the garage on an exterior wall, fairly close to the office. With some conduit and a minimal amount of rewiring, we were able to exit the garage wall very easily and without making a huge mess. Now our two main power feeds would be able to make the trek to the office. Enter the big machinery…
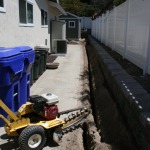 As you can see from the photo, I chose to rent a trencher instead of attempting to dig that 60’+ long and 18” deep run to the office by hand. Definitely worth every penny, because our ground is unforgiving clay mostly. Luckily it was pretty much a straight shot from the side of the office where the circuit breaker was installed, to where our conduit poked out through the side of the garage (just out of frame, behind the trencher). The only other obstacle was tunneling under the concrete pathway that stood between the trench and the garage. This involved plenty of sweat, swearing, and finally a high pressure water nozzle attached to a short length of pipe to “drill” a hole to the other side. Whew!
Once the hard part was done, I simply had to piece together and glue a bunch of plastic electrical conduit from the garage to the office, and lay it in the bottom of the trench. There are junction boxes at either end to facilitate pulling the two main power wires from one end to the other. You do this by first pushing an electrician’s “fish tape” from one end to the other, attaching your wires to it, and then pulling it back through. We made the final connections, switched on all of the breakers and tested all of the outlets and switches. Success! One quick note on burying the conduit in the trench, surround the conduit itself with very soft dirt or sand first and then pile the dirt in on top of it. This prevents rocks or uneven ground from breaking the conduit and letting water into the system (water and electricity are mortal enemies and must be separated at all times ;-).
Network/Video Cabling
Interior
The interior network and video cabling was all put into place during the rough framing stage. All that was left to do was to wire up the various outlets around the office. The outlets would all use keystone wall plates which allow a number of different connectors to be inserted into them. For example, in the network drop that would ultimately reside under my desk, I installed a four-way keystone wall plate, with each position containing a Cat6 jack. Other locations in the office would be three-way keystone wall plates containing two Cat6 jacks and one coax video jack. I also ran a standard telephone jack to one of the outlets just in case (but will probably never need to use it). Wiring the Cat6 keystone jacks is pretty straight forward. Using a punch down tool, the correct individual wires within the Cat6 cable are pushed into the jack. I order many of the parts and tools for this job from CableSupply.com. They also have a good number of video tutorials on how to perform the wiring –http://cablesupply.com/Tutorials.html
Within the Leviton Media Enclosure (the central point to where all of the network and video cabling in the walls originates, a Cat6 punch down block was installed, and all of the Cat6 lines from the wall outlets terminate here.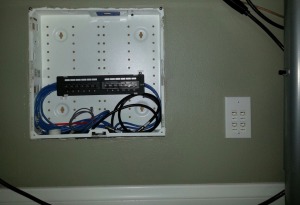 This allows for easy connection to a network switch (also to be installed inside the enclosure) via short patch cables. Video coax cables (and the one telephone cable) simply had standard connectors crimped to them. The enclosure contains a surge suppressed power outlet (top) to power the network switch or any other devices that may be placed here.
The small white tubing (lower left corner) is where the main network and video feeds from the house will enter the office. From the house and into this enclosure, I plan on running two Cat6 lines (one main and one as a backup), one video line, and one telephone line. The Cat6 line will be adding to the punch down block (ports 11 & 12), and then connected to a network switch, which will then connect all of the wall outlets (via the punch down block, ports 1 – 8). The video line will be connected to a splitter and then to the two lines coming from the walls. The telephone line will probably not be connected unless I need it.
The whole enclosure is covered with a large white metal plate to keep everything out of sight. In the above photo, you can also see an example of the keystone Cat6 wall plate.
Exterior
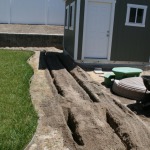 Getting the network and video lines from the house to the office follows the same basic procedure as with the power lines. Dig a trench, lay down some plastic electrical conduit, and pull the wires through it. This time, I was able to get much closer to the office, by starting at the back of the house. I still had to tunnel under a blasted sidewalk again, but what can you do. While I was renting the trencher, I decided to dig some trenches for sprinklers as well.
This shorter run of conduit would be terminated at both the house and the office with a junction box, to facilitate the pulling of wires through it. Since the house has a crawl space (not sitting on a concrete slab), it was easy to get the conduit through one of the ventilation grates on the house. I will be running Cat6 and video cable through out the house within the crawl space, at some point (another project all together – centralized/structured wiring), so this will simply be another run…albeit a bit longer.
Until I get that project underway, I’ve been relying on wireless connections from the house to the office. I was happily surprised to find it working rather well so far. Although, it will be nice to have the higher speeds afforded by a wired connection.
Wrap Up
There are a few minor things to wrap up the project, like:
- Cutting a whole in the back wall and installing the window air conditioning unit (see photo below).
- Installing window blinds.
- Moving in all of the furniture, computers, monitors, accessories, books, CDs, etc. (and trying to keep it organized).
For the most part, the office has been completed and serving me well for several months. I’m still slowly getting fully moved in while working from home a few days per week. I’d show more pictures of the inside, but it is still quite a disaster, but it is coming along. I am really enjoying having a separate home office that is super functional that was designed exactly how I wanted.
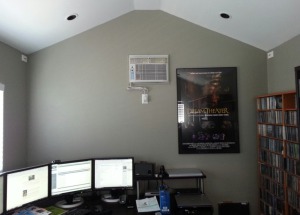 So, that about covers the backyard office project. Hopefully this series of articles provides some inspiration and a little instruction to creating your own office. I’ll be posting more pictures in the Photos album – The Backyard Office as I get it a bit more presentable.
Comments (copied from original blog post)
I actually saw a backyard office built on an HGTV show and decided that was what I needed to take my Ph.D. exams and write my dissertation. I stumbled upon your blog while researching if a non-HGTV-type (but handy) person could actually complete such a feat.I’m curious as to how your sealed your AC unit (to keep the air in and the bugs out!) We sealed the windows with a foam, but I was unsure if that would work with the AC unit as well.Thanks for the inspiration and the detailed description of your building process.
Heading down this path this summer. AWESOME documentation of your project and pictures. Really great way to communicate your experience, and I pinned your picture gallery for some ideas when finishing comes. Thanks a lot.
Good luck on the project. Post some pictures once you are done. I like checking out what others come up with.
Will do. The unit was built two weeks ago and, as you noticed, just amazing at how quickly they put that thing up. 2.5 hours TOTAL. Lining up the electrical work soon. Thinking of adding in-wall speakers while the the walls are open instead of bookshelf speakers later on.
In touch again soon.